Friday, April 22, 2011

So...What Happened?

When I purchased the car, I was not given any history. In fact, the wrecking yard had acquired the car in 2001 and listed it as a Financial Write-Off, returning the plates and destroying all documentation. Needless to say, the registration authorities were deeply sceptical until one kind chap took it on himself to research the car, finding it registered in South Australia since almost new, last registered in 1986.

I breathed a sigh of relief, I can tell you.

At this point I appealed to others for information also. A response via the Triumph Sports Owners Association of South Australia mentioned that they had seen the car for sale in the late 1990's (at that stage running quite well apparently), the elderly (original) owner claiming his wife had reversed into a brick wall at high speed!

So, that seems to be the reason for all this mess - she certainly must have been travelling!

Tanking It:

Amongst the last, but certainly not the least of the rear end damage casualties, was the fuel tank. The tank had been partially dislodged in the accident, damaging some of the mounting points and creasing the tank at several points...hence it took about 6 hours to remove it! As the tank came from a Triumph Herald Estate or Courier (Herald Van - extremely rare), there was little hope of finding a replacement laying under a tree, so repair was the only option.

After a 6 hours armwrestle, we extracted this ugly thing

The tank had an ominous looking crease at one point, which had bowed the top of the tank upwards, so that it would not be possible to refit beneath the fibreglass false floor of the Equipe (broken into pieces - another job for Norm and I). Luckily, there was no leak, but would need to be retested after the crease had been pulled out.

Being punted on the seam had buckled the top nicely. In addition to not fitting under the false floor, I'm not sure the fuel sender would read properly - I'd likely be out of fuel constantly!

My first port of call requested $800 to straighten the tank, with no guarantee of successful repair. When I had finished laughing, I had the tank blasted and etch primed, then approached some local panel beaters. No-one was super keen, and I was beginning to despair when I heard of a chap North or Adelaide who repaired motorcycle tanks. One week and $75 later, the tank came back straightened and flat again - not perfectly dent free, but given its location deep inside the boot, I was prepared to let this one slide. No leak, that was the main thing.

Not perfectly straight, but flat and safe - a giant relief

Of course, I'm sworn to secrecy over the repair technique, but suffice to say it was very clever. Very happy with the results for my meagre investment.

About 18 months on, it remains yet to be painted, but there's no rush. The sender was tested and worked fine, the whole lot sits in the garage awaiting re-assembly.

Tuesday, April 19, 2011

Boot the Bond

Whilst all this was going on, the bootlid languished in the rear of the workshop - we'd used it a few times for reference (getting the bodywork in the correct position), but once all that was done, Norm volunteered to take it home to look at the standard of the 'glassing.

The bootlid had obviously sustained a belt in the lower right corner, probably popping on impact (as the aluminium box section housing the latch had partially de-laminated, a hinge was bent, the lower rear windscreen dropped and some cracking evident). Norm got it home and found a lot of cracking.

Star cracking...across the universe.

Hinge removed, so rear could be 'glassed.

Sanding the bootlid back, a lot of talc had been used in the production process - Norm took it back, and back, and back, stopping when he was worried there'd be nothing left! Building the bootlid back up again, a substantial amount of material was added (wait for the bodywork blog entries, they show the process quite clearly), then primed and sanded back smooth. It was a work of art...until it slid out of position tonight and crashed to the floor, taking a few chips out of the 'glass work.

Here's some pics before it hit the floor.

Beautifully sealed underneath, waiting for a fresh coat of red 2K

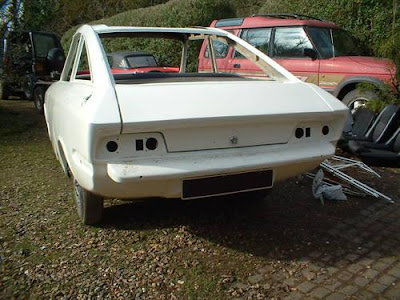
It has made good reference with one corner of the bodywork now in place - many adjustments to be made, but here's a sneak preview...

Monday, April 11, 2011

Starting at the Rear

Ahhh...Nirvana. A tidy butt!

The one thing that will make me feel like real progress has been made with this car, will be when the back is in one piece, primed and ready for paint. It's a mile off, but getting there. In September 2009 Norm and I made a start.

Step 1: Fuel tank out (took about 4 hours), we'll deal with that later.

Step 2: Cut away all the excess material from the damaged rear, and from the large boot floor replacement section. Removing the old fibreglass back to the steel section over the differential, allowed us to place the new section on the rear chassis members and provide a positive location.

Step 3: Bolt the new 'glass section to the lip along the edge of the steel panel (finding the rusted remains of bolts in the fibreglass, this was obviously how they did it in production too), and then through two bolt holes on the chassis members.

Done. Note the 'hatched' areas - these are the be ground clean to allow 'glass strips to be laid along the edges of the panel joints. With this section in place, we could trim and line up the two new rear corners.

Step 4: First the left, clamped in place with aluminium brackets, screwed into the bodywork.

Step 5: Now for the right. This was a lot more troublesome - firstly the replacement panel was a little short, secondly, there was some truly awful previous repair attempts to contend with. In addition to this, the impact on the right side had pushed the bottom corner of the steel reinforced gutter downward, causing some alignment issues - this will need to be bent upward back into position. Tricky.

After about 5 hours work, we finally had what appeared to be a complete rear end - amazing. Norm really knew what he was doing and made the solution sound so simple. Not so easy (or clean) though, the next step is to grind clean the hatched areas and get out the craft glue!